
Learning how to install lift kit on Ram 1500 trucks saves you $500-800 in labor costs while giving you complete control over the build quality. Installing a lift kit yourself isn’t rocket science, but it does require the right tools, safety precautions, and knowing what you’re doing at each step.
This guide walks you through the entire process from start to finish, covering everything you need to lift your Ram in your own garage. Whether you’re going with a simple leveling kit or a full 4-inch lift, you’ll know exactly what to do by the end of this article.
Why Install a Lift Kit on Your Ram 1500
A lift kit transforms your Ram from a stock truck into something way more capable and aggressive-looking. You get increased ground clearance for off-roading, room for bigger tires, and a stance that turns heads.
Beyond looks, lift kits serve real functional purposes. Towing gets easier with better suspension geometry, and you can navigate rough terrain without scraping your undercarriage.
Benefits of Lifting Your Ram
Here’s what you gain from installing a lift kit:
Practical benefits:
- More ground clearance (4-6 extra inches)
- Fits 33″-37″ tires without rubbing
- Better approach and departure angles
- Improved visibility from higher seating position
- Enhanced off-road capability
Aesthetic upgrades:
- Aggressive, lifted stance
- Fills out wheel wells better
- More intimidating presence
- Better proportions with bigger tires
Most Ram owners lift their trucks for a mix of function and looks. Even if you never go off-road, a lifted Ram just looks better than stock.
Tools You’ll Need to Install Ram 1500 Lift Kit
Having the right tools makes installation way easier and safer. Don’t start until you’ve got everything ready to go.
Essential Tools for Lift Installation
Here’s what you absolutely need:
Basic hand tools:
- Socket set (metric and standard)
- Wrench set (10mm-24mm most common)
- Breaker bar for stuck bolts
- Torque wrench (critical for proper torque)
- Ratchet with extensions
Lifting and safety equipment:
- Floor jack (3-ton minimum)
- 4 jack stands (rated for your truck’s weight)
- Wheel chocks
- Safety glasses and gloves
Specialty tools:
- Spring compressor (for coilover lifts)
- Penetrating oil (PB Blaster or similar)
- Anti-seize compound
- Thread locker (blue Loctite)
You can rent spring compressors from auto parts stores for free. Just leave a deposit and return them when done.
Nice-to-Have Tools
These make the job easier but aren’t required:
- Impact wrench (saves tons of time)
- Transmission jack (for supporting suspension)
- Pneumatic tools if you have a compressor
- Work light for seeing under the truck
- Creeper for working underneath
The biggest time-saver is an impact wrench. What takes 10 minutes with hand tools takes 30 seconds with an impact.
Types of Lift Kits for Ram 1500
Not all lift kits are created equal. Understanding the differences helps you pick the right one and know what you’re installing.
Leveling Kits (Easiest)
Leveling kits lift just the front of your Ram 1-3 inches to match the rear height. These are the simplest installs, taking 1-2 hours.
Leveling kit pros:
- Cheap ($100-300)
- Easy DIY installation
- Fits 33″ tires usually
- Keeps stock ride quality mostly
Leveling kits use spacers that sit on top of your front struts. You’re literally just adding a chunk of metal or polyurethane to lift the front end.
Spacer Lift Kits (Moderate)
Spacer lifts add height to both front and rear suspension using spacers. They’re affordable and relatively simple to install.
Spacer lift characteristics:
- Cost $200-500 typically
- 2-4 hours installation time
- Uses factory suspension components
- Ride quality stays similar to stock
These work well for street trucks and mild off-road use. Not ideal for serious trail running or rock crawling though.
Coilover Lift Kits (Best)
Coilover kits replace your entire front strut assemblies with taller, performance units. These deliver the best results but cost more and take longer to install.
Coilover lift advantages:
- Better ride quality than spacers
- Adjustable height on some models
- Handles heavy loads better
- Lasts longer than spacer kits
- Cost $600-1,500+
Brands like Bilstein, Fox, and King make killer coilover kits. You’re getting what you pay for with better engineering and materials.
How to Install Lift Kit on Ram 1500: Step-by-Step
Now we’re getting into the actual installation process. This covers a typical 4-inch lift kit with coilover front struts and rear springs.
Safety First: Prep Work
Before you even touch a wrench, handle the safety stuff. Working under trucks is dangerous if you’re careless.
Safety checklist:
- Park on level, solid ground (not dirt or gravel)
- Set parking brake firmly
- Put transmission in park
- Chock rear wheels front and back
- Let exhaust cool completely
- Wear safety glasses
Never work under a truck supported only by a jack. Jacks fail and trucks fall. Use jack stands rated for your Ram’s weight, always.
Step 1: Remove Wheels and Tires
Start by loosening lug nuts while the truck is still on the ground. Then jack up one corner at a time and set it on jack stands.
Wheel removal process:
- Loosen lug nuts 1/4 turn (truck still on ground)
- Jack up corner using frame jack points
- Place jack stand under frame rail
- Remove lug nuts completely
- Pull wheel off and set aside
Do all four corners so the truck is completely supported on jack stands. Double-check stability before crawling underneath.
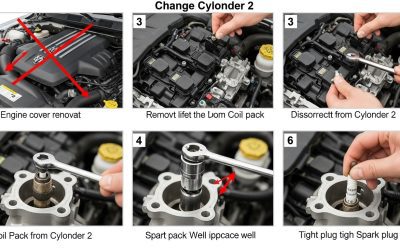
Step 2: Remove Front Strut Assemblies
The front suspension is usually the harder part. You’re removing the complete strut assembly from the top and bottom.
Front strut removal:
- Unbolt brake line bracket from strut
- Remove sway bar end link
- Remove lower strut bolts (2-3 bolts)
- Pop hood and locate strut tower
- Remove 3-4 nuts from top of strut
- Pull strut assembly out
Mark or photograph which way things go before removing. This helps during reassembly when you’re second-guessing yourself.
Step 3: Install New Front Struts
Your new lift struts bolt in basically the same way the old ones came out. Just in reverse order.
Installation steps:
- Insert new strut through lower control arm
- Hand-thread top nuts first
- Align lower mounting holes
- Install lower bolts hand-tight
- Torque all fasteners to spec (critical!)
- Reattach brake line and sway bar
Don’t fully tighten anything until everything’s lined up. Then torque to manufacturer specs—this isn’t optional.
Step 4: Install Rear Lift Components
The rear is usually simpler than the front. Most kits use either spacer blocks or replacement springs.
Rear lift installation:
- Support rear axle with jack or stands
- Remove shock absorber bolts
- Lower axle to relieve spring tension
- Remove u-bolts holding springs
- Install lift blocks or new springs
- Replace u-bolts with longer ones (included in kit)
- Reinstall shocks
If your kit includes new rear shocks, install those instead of reusing stock ones. New shocks handle the added height better.
Step 5: Torque Everything to Spec
This step separates good installs from dangerous ones. Every bolt needs proper torque—not just “tight enough.”
Critical torque points:
- Front strut top nuts: Usually 35-45 ft-lbs
- Lower strut bolts: 80-100 ft-lbs typically
- U-bolts: 90-120 ft-lbs
- Wheel lug nuts: 130-140 ft-lbs for Ram
Check your specific kit instructions for exact numbers. Over-torquing can strip threads while under-torquing lets things come loose.
Step 6: Reinstall Wheels and Test
Put your wheels back on, torque the lug nuts in a star pattern, and carefully lower the truck off the jack stands.
Final installation steps:
- Hand-thread all lug nuts
- Snug them down with impact or wrench
- Lower truck to ground
- Torque lug nuts to final spec
- Bounce each corner to settle suspension
Don’t drive yet. You’ve got a couple more critical steps before hitting the road.
Post-Installation Requirements
Your lift kit isn’t done just because it’s bolted on. These next steps are mandatory for safety and proper operation.
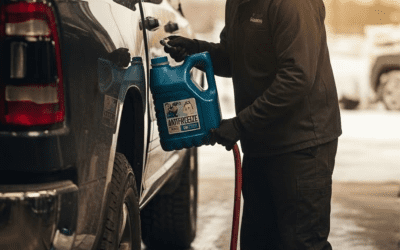
Get an Alignment Immediately
Alignment is non-negotiable after installing a lift kit. Your suspension geometry changed drastically and your Ram will eat tires without proper alignment.
Drive straight to an alignment shop—don’t wait a few days. Seriously, do this same day if possible.
What to tell the alignment shop:
- “I just installed a lift kit”
- “Check all adjustable angles”
- “Set it to lift kit specs, not factory”
- “I need a full four-wheel alignment”
Good shops know lifted trucks need different specs than stock. If they seem confused, find a different shop.
Break-In Period
New suspension needs time to settle and break in. Drive carefully the first 100-200 miles.
Break-in guidelines:
- Avoid hard acceleration and braking
- Take corners gently
- No off-roading yet
- Let parts settle into place
- Recheck torque after 50 miles
After a week of driving, crawl under and check that nothing loosened up. Retorque anything that moved.
Test Drive and Check
Take your Ram for a test drive and pay attention to anything that feels wrong.
What to check:
- Steering feels normal and centered
- No weird noises or clunks
- Truck drives straight without pulling
- No vibrations at speed
- Brakes work normally
Any issues mean something’s wrong with the install. Don’t ignore problems hoping they’ll go away.
Common Mistakes Installing Ram Lift Kits
Even experienced DIYers screw these up. Learn from others’ mistakes instead of making your own.
Skipping Torque Specs
Guessing at torque is the #1 mistake. Too loose and bolts back out while driving. Too tight and you strip threads or snap bolts.
Buy or borrow a torque wrench if you don’t own one. They’re $30-50 for a decent one and you’ll use it forever.
Wrong Jack Stand Placement
Setting jack stands under the axle or control arms is dangerous. They need to go under the frame rails where the truck’s designed to be supported.
Look for reinforced areas on the frame. Your owner’s manual shows safe jack points.
Reusing Old Hardware
Some bolts and nuts are one-time use only. Stretch bolts, nyloc nuts, and certain suspension fasteners can’t be reused safely.
Your lift kit should include all new hardware. Use it. Don’t try saving $5 by reusing old bolts that might fail.
Not Checking Fitment
Before fully tightening everything, cycle the suspension through its full range of motion. Make sure nothing binds, rubs, or hits.
Turn the wheels lock-to-lock and bounce each corner hard. If anything touches, figure out why before finishing the install.
Lift Kit Installation Costs Breakdown
Understanding costs helps you budget properly for your Ram lift project.
DIY Installation Costs
Doing it yourself costs way less than paying a shop:
Cost breakdown:
- Lift kit: $300-1,500 (depends on brand/type)
- Tools (if you don’t have them): $100-200
- Alignment after install: $100-150
- Miscellaneous supplies: $50
- Total DIY: $550-1,900
The lift kit itself is the biggest variable. Budget kits start around $300 while premium setups run $1,500+.
Professional Installation Costs
Shops charge serious money for lift installations:
Shop pricing:
- Labor: $500-800 typically
- Lift kit markup: 20-40% over retail
- Alignment: $100-150
- Total shop install: $1,200-2,500+
You’re paying for their expertise and warranty on the work. That’s worth it if you’re not confident doing it yourself.
Best Lift Kit Brands for Ram 1500
Brand matters when it comes to quality and longevity. These companies make solid kits.
Budget-Friendly Options
Rough Country dominates the budget lift market. Their kits work fine for street trucks and mild off-road use.
Rough Country kits run $300-600 and include lifetime warranties. Ride quality is okay but not amazing.
ReadyLIFT makes good leveling kits and smaller lifts. Their stuff installs easy and performs well for daily drivers.
Premium Lift Kit Brands
BDS Suspension builds tough kits for serious use. Everything’s beefed up and designed to last 100,000+ miles.
BDS kits cost $800-1,500 but you get what you pay for. Better engineering, better materials, better warranty support.
Bilstein and Fox make killer coilover setups. These are the best-riding lift kits you can buy for Rams.
Expect $1,200-2,000 for quality coilover kits. If you drive your Ram daily and want comfort, these are worth it.
Tire Sizes After Lifting Ram 1500
Lifting your Ram opens up way more tire options. Here’s what fits with different lift heights.
Stock to 2-Inch Lift
With stock height or a small leveling kit, you’re limited:
- Stock: Up to 275/65R18 (32.1″ diameter)
- 1-2″ lift: Up to 285/70R17 (32.7″ diameter)
- Possible 33s with minor trimming
You can squeeze slightly bigger tires on with trimming fender liners. Not ideal but doable.
3-4 Inch Lift
This is the sweet spot for most Ram owners:
- 3″ lift: 33×12.50R17 or 305/70R17
- 4″ lift: 35×12.50R17 or 315/70R17
- No trimming required usually
35-inch tires look perfect on a lifted Ram without being too much. Great balance of looks and practicality.
6+ Inch Lift
Big lifts clear big tires:
- 6″ lift: 37×12.50R17 easy
- 8″ lift: 40″ tires possible
- Trimming usually still needed
Going this big affects daily driving, fuel economy, and ride quality significantly. Only do it if you actually need it.
Alignment Specs for Lifted Ram 1500
After installing a lift, your Ram needs specific alignment settings different from stock specs.
What Changes With a Lift
Lifting changes suspension geometry which affects how your truck handles and wears tires.
Key angles that change:
- Camber (wheel tilt)
- Caster (steering axis angle)
- Toe (wheel pointing)
Most alignment shops understand lifted trucks and have the right specs. But some don’t, so be prepared to educate them if needed.
Finding a Good Alignment Shop
Look for shops that specialize in trucks or off-road vehicles. They’ll know lifted truck specs.
Questions to ask:
- “Do you do lifted truck alignments regularly?”
- “Can you adjust all angles?”
- “What specs do you use for lifted trucks?”
If they can’t answer confidently, keep looking. Bad alignment ruins tires and makes your truck handle like crap.
Maintaining Your Lifted Ram 1500
Lifted trucks need slightly different maintenance than stock ones. Stay on top of these things.
Regular Maintenance Checks
Check your suspension components more often than you would on a stock truck.
Inspection schedule:
- Every oil change: Visual inspection underneath
- Every 10,000 miles: Check all suspension bolts
- Every 25,000 miles: Inspect bushings and joints
- Yearly: Full suspension inspection
Lifted trucks put more stress on components. Catching wear early prevents bigger problems.
What Wears Faster on Lifted Trucks
Certain parts wear quicker with a lift installed:
Higher wear items:
- CV axles and boots
- Ball joints
- Tie rod ends
- Wheel bearings
- Brake components
Budget for replacing these more frequently than on a stock Ram. That’s the trade-off for the lifted stance.
Conclusion
Learning how to install lift kit on Ram 1500 trucks saves you serious money while giving you control over the build quality. The process takes 6-8 hours for most DIYers and requires basic tools plus some patience.
Start with proper planning, gather all your tools, and work methodically through each step. Don’t skip critical steps like torquing to spec or getting an immediate alignment afterward.
Whether you choose a simple leveling kit or a full 4-inch coilover setup, the satisfaction of doing it yourself beats paying a shop every time. Your Ram will look better, perform better off-road, and you’ll have the skills to maintain it yourself going forward.
Frequently Asked Questions
Q: How long does it take to install a lift kit on Ram 1500?
A: Most DIYers complete a full lift kit installation in 6-8 hours. Simple leveling kits take 1-2 hours, while complex coilover setups with rear springs can take a full day. Having a helper speeds things up, especially when installing heavy strut assemblies and positioning rear springs.
Q: Do I need an alignment after installing a lift kit?
A: Yes, absolutely. Getting an alignment immediately after lift kit installation is mandatory. Your suspension geometry changed dramatically and your Ram will eat tires and handle poorly without proper alignment. Drive straight to an alignment shop the same day you finish the install.
Q: Can I install a lift kit by myself or do I need help?
A: You can do most of the work solo, but having a helper makes certain steps way easier and safer. Handling heavy strut assemblies, positioning rear springs, and supporting the axle during rear installation all benefit from an extra set of hands. Budget 50% more time if working alone.
Q: Will a lift kit void my Ram warranty?
A: It depends. Aftermarket modifications can void warranty coverage for related components. If your lifted suspension causes a differential failure, that won’t be covered. But unrelated issues like engine problems should still be covered. Keep all receipts and documentation showing proper installation.
Q: What size tires fit on a lifted Ram 1500?
A: A 2-inch leveling kit clears 33-inch tires, a 4-inch lift fits 35-inch tires without issues, and 6-inch+ lifts handle 37-inch tires easily. Wheel offset and backspacing also matter for fitment. Staying within these guidelines prevents rubbing at full lock or compression.
Q: How much does it cost to install a lift kit on Ram 1500?
A: DIY installation costs $550-1,900 total including the kit ($300-1,500), tools if needed ($100-200), alignment ($100-150), and supplies ($50). Professional shop installation runs $1,200-2,500+ including marked-up parts and $500-800 labor. You save $500-800 minimum doing it yourself.


0 Comments